The Inclusive Design Log (Transport) is a PowerPoint file that helps design teams and other stakeholders to implement the process (described in this website) for designing inclusive transport services.
The log contains slides that can be used to store outputs and notes from each of the activities within the Inclusive Design Wheel for Transport. Navigating the log is facilitated by a Project Board, which is a visual table of contents. Clicking on an activity on the Project Board takes you the slides for that activity.
The log also contains worked examples for each of the activities, which are based on the DIGNITY pilot projects.
Further instructions on using this log are provided further down this page.
On this page:
The Inclusive Design Log (Transport) has been created to assist implementing the process for inclusive transport service design described within this section. Download the Inclusive Design Log for Transport (v2.2)
Navigating between slides
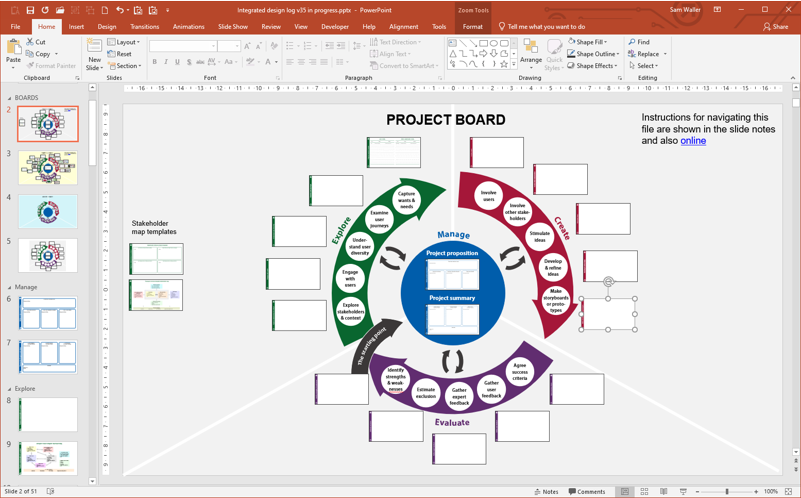
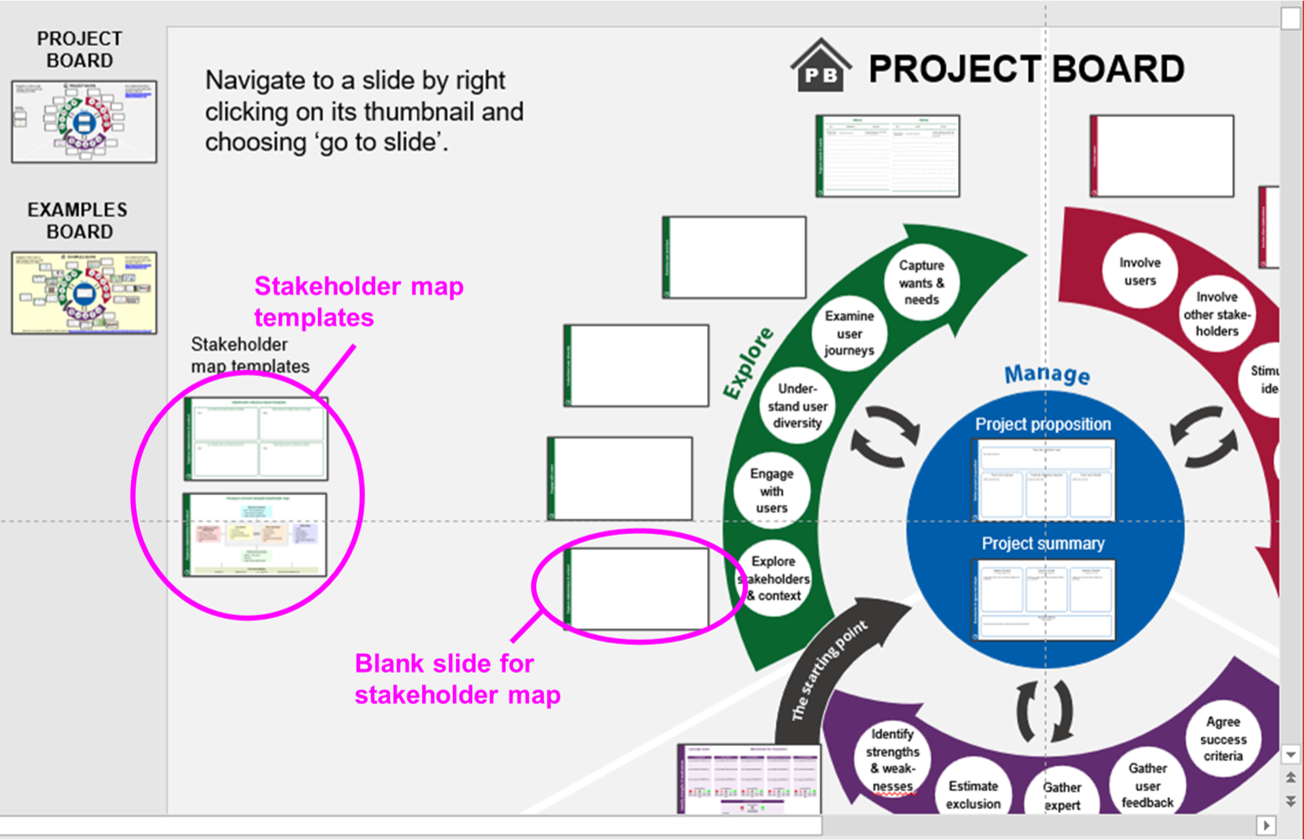
The screenshot below shows the Project board, which is a visual and navigable summary of all your content on a project, as shown in the screenshot below.
The Project board makes extensive use of slide zooms, which are a new navigation feature introduced in PowerPoint 365, and in PowerPoint 2019 onwards.
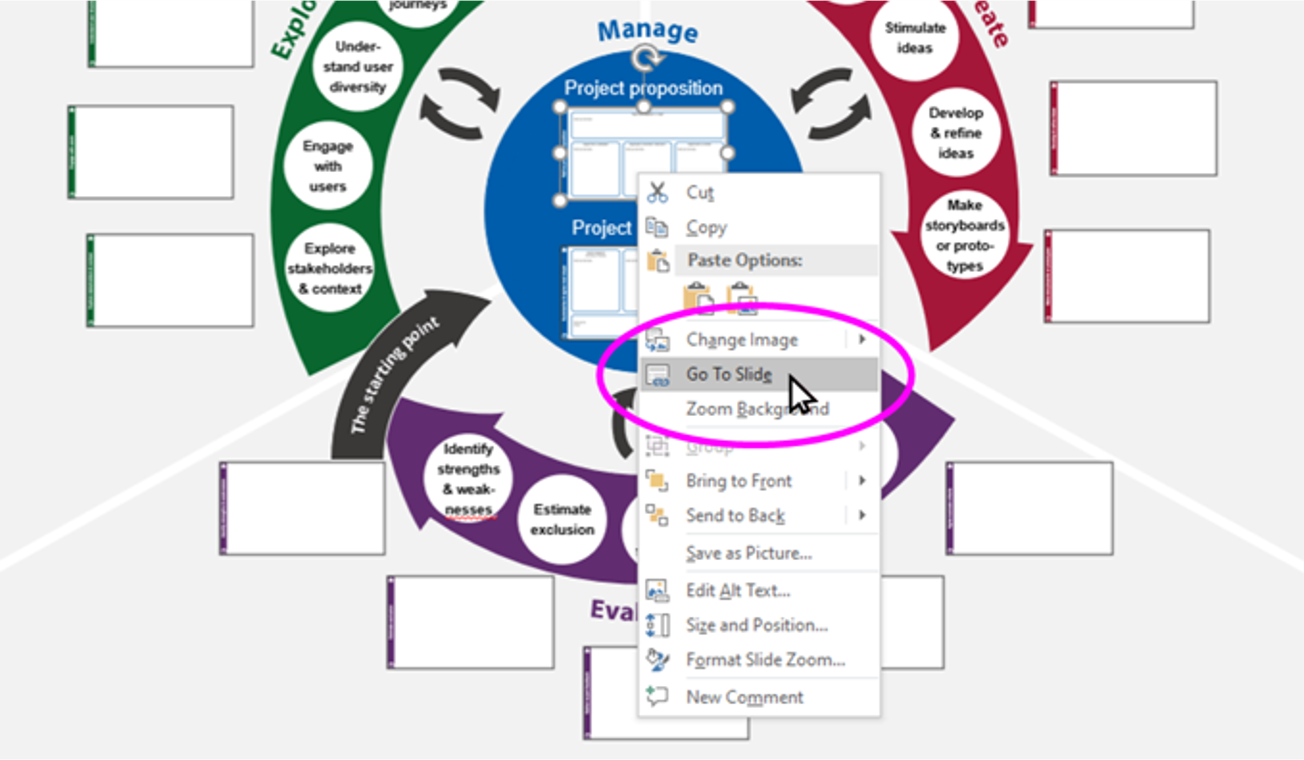
A slide zoom is a thumbnail image of a slide, which is automatically updated whenever the corresponding slide is updated. You can navigate to this slide by right clicking on the thumbnail and choosing Go to slide, as shown in the screenshot below.
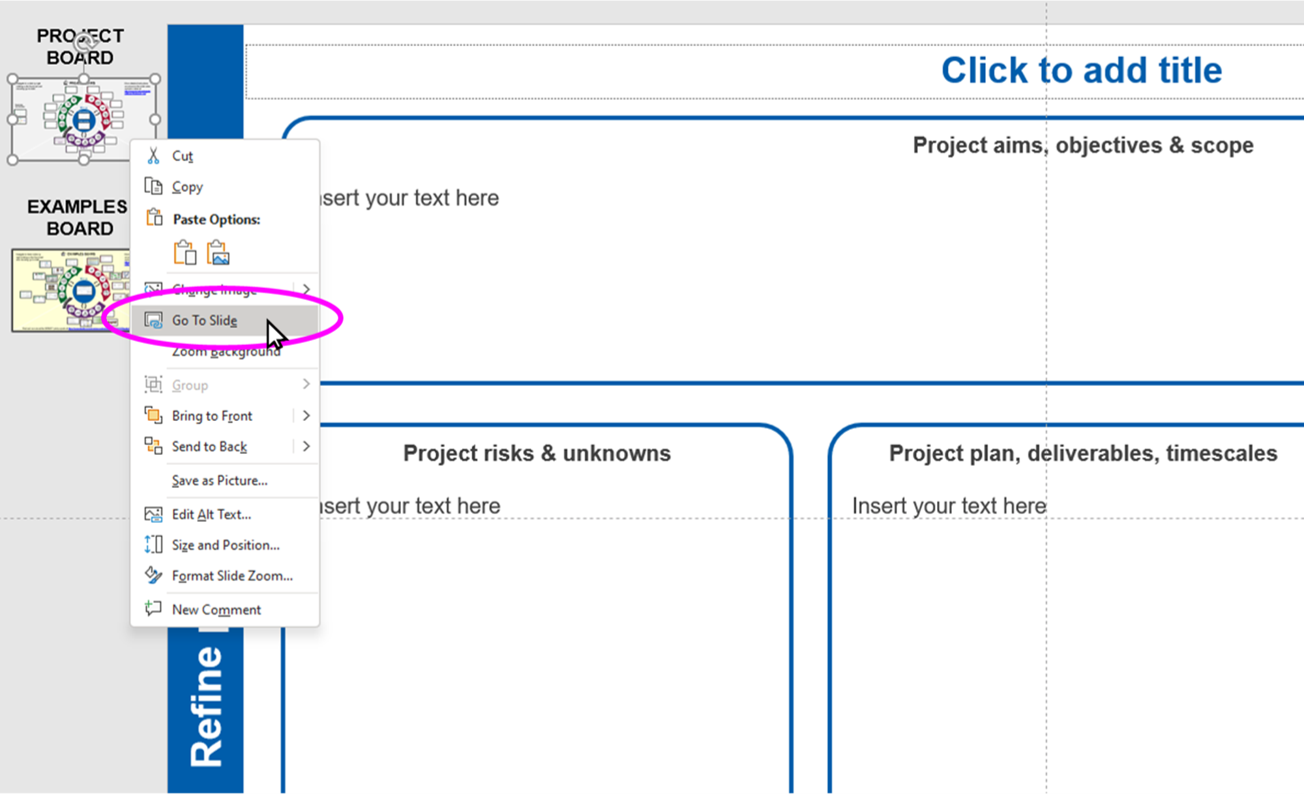
Once you have navigated to a slide, you can get back to the Project Board by right clicking on the thumbnail of the Project board and choosing Go to slide. This thumbnail is the topmost of the two thumbnails just off each slide on the top left, as shown below.
If you are in Presenter mode, then you can navigate from the project board by left clicking on the slide thumbnail. Unfortunately though, the thumbnail for navigating back to the Project board is not visible in Presenter mode. However, while in this mode, you can navigate back to the project board by typing it’s slide number and then pressing the ‘Enter’ key
The Project board also contains some additional templates that might be useful for creating stakeholder maps, as shown in the screenshot below.
Creating new project slides
To create a new slide for additional project content, simply duplicate one of the existing slides. On the new slide, update the slide title that runs along the top of the slide, and delete everything else on the slide except for the vertical coloured stripe, and the thumbnails of the Project and Example boards.
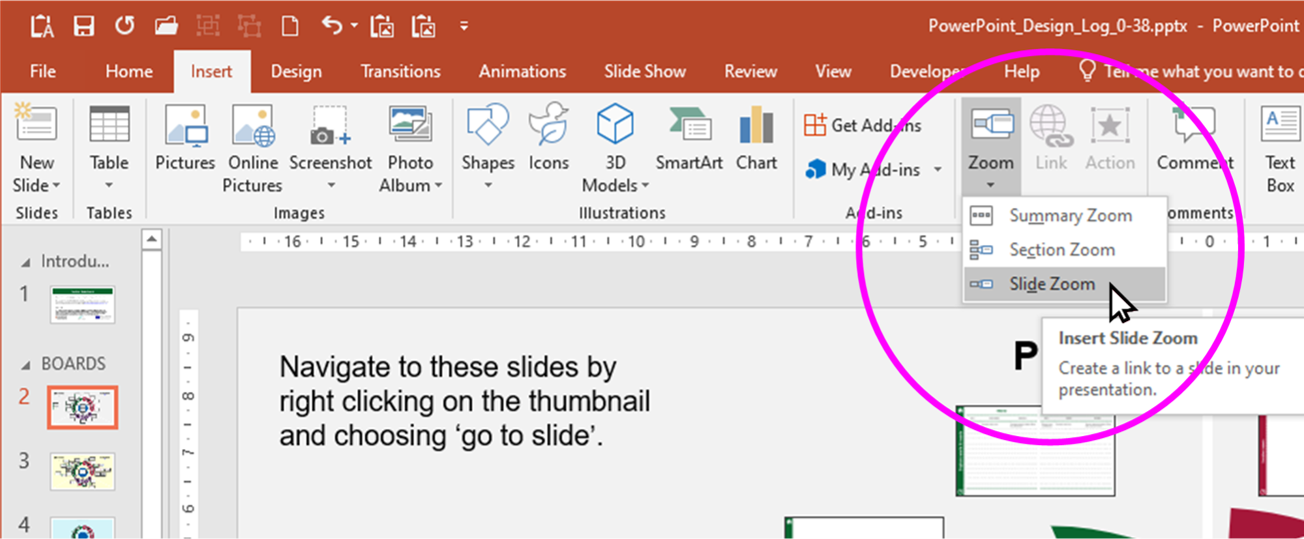
To add your new slide to the Project board, click the ‘Insert’ tab in the Ribbon, and then ‘Zoom’ and then ‘Slide zoom’, as shown in the screenshot below.
Next, choose the slide(s) that you want to insert thumbnails for, and then click ‘Insert’.
Alternatively, slide zooms can be inserted by dragging the appropriate slides from the ‘thumbnail pane’ on the left hand side in PowerPoint, and dropping them onto the project board.
Once you have added a thumbnail, you might like to change its outline colour and line thickness to match the other thumbnails. You can do this by selecting the thumbnail, choosing the ‘Zoom’ tab in the Ribbon and then click on ‘Zoom border’, change the colour to Black and the line weight to 1.
Viewing the worked examples
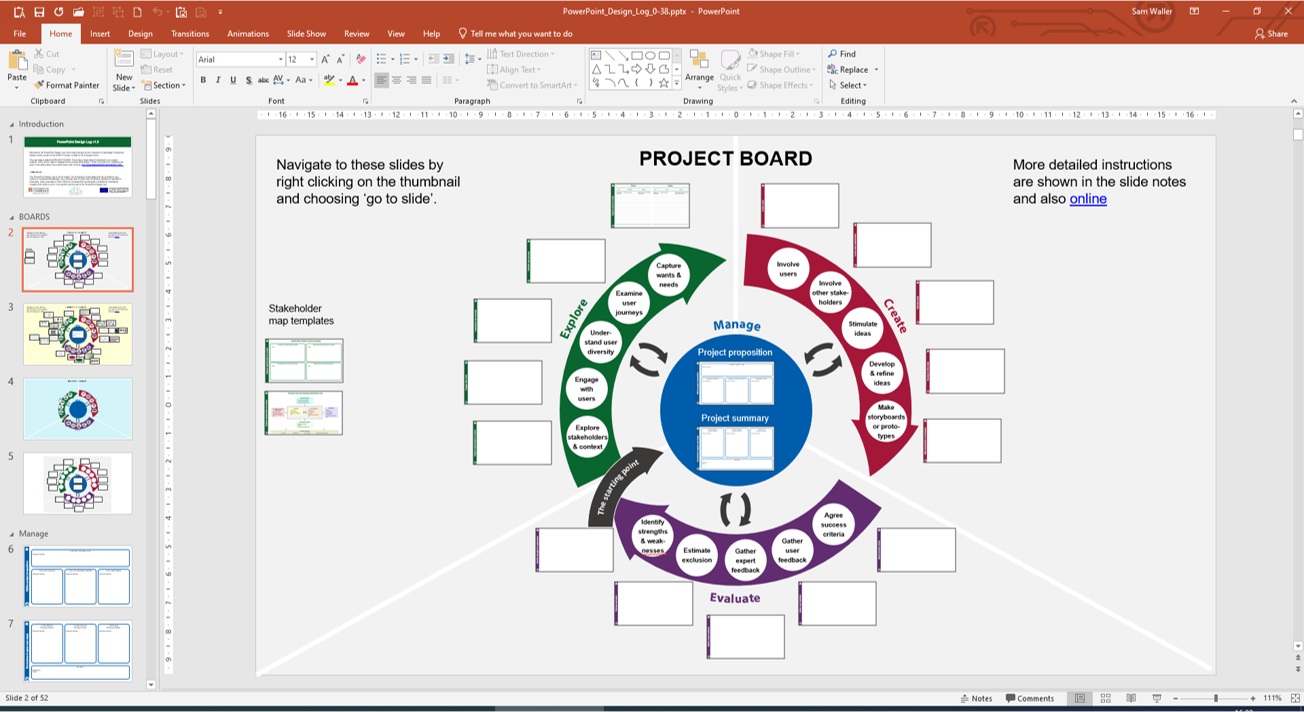
Immediately after the Project board, there is a slide called the Examples board, which is a visual and navigable summary of examples for the activities within the wheel, as shown below.

Navigation to and from the examples works in a similar way to the Project board. All of the thumbnails on the Examples board are slide zooms, so you can navigate to the corresponding example slide by right clicking on the thumbnail and choosing Go to slide.
Once you have navigated to a slide, you can get back to the Examples Board by right clicking on the thumbnail of the Examples board and choosing Go to slide. This thumbnail is the second of the two thumbnails just off each slide on the top left.
Viewing the guidance for each activity
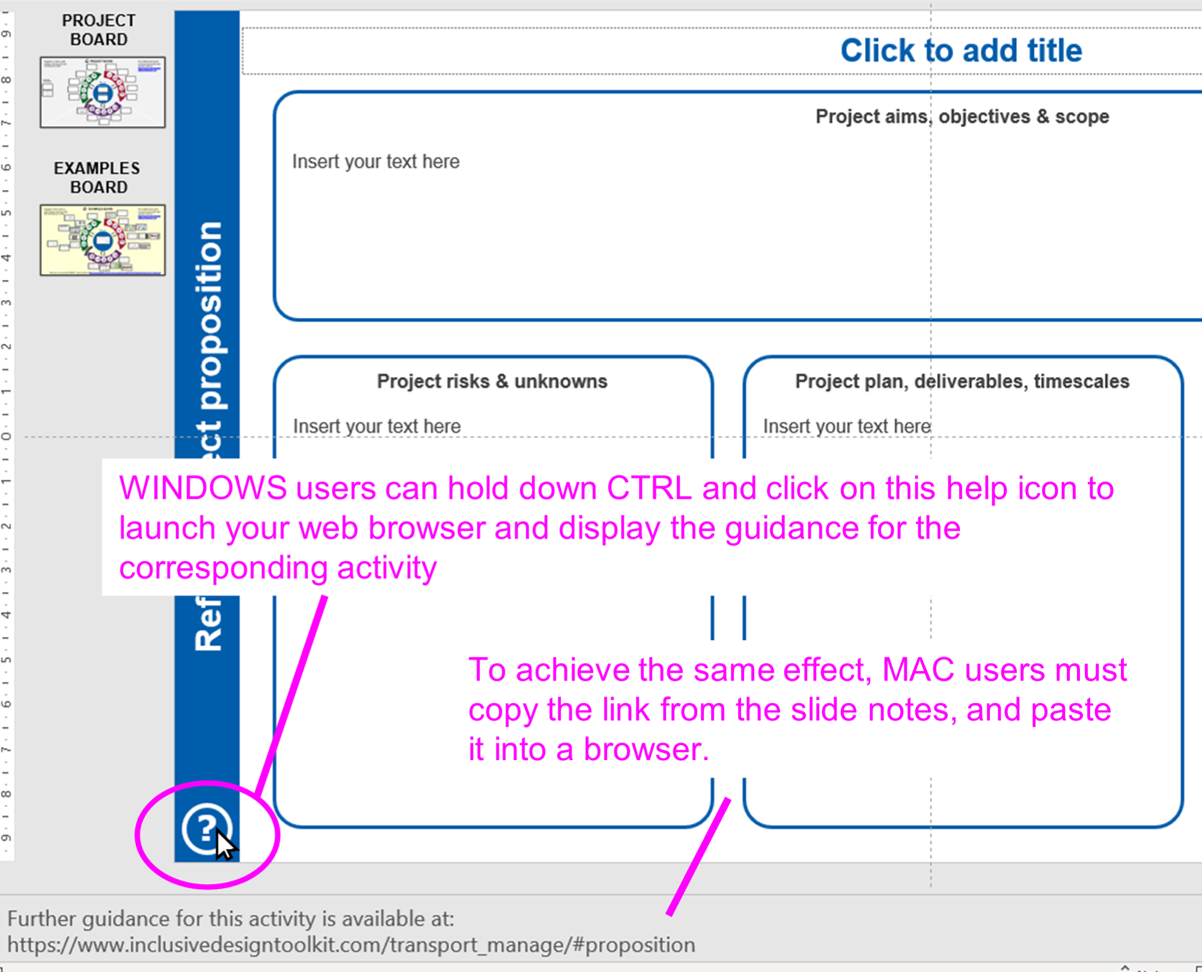
Each of the activity slides in the log has a help icon in the bottom left-hand corner. WINDOWS users can hold down CTRL and click on this icon to launch a web browser and display the webpage from the Inclusive Design Toolkit that provides guidance on the corresponding activity.
To achieve the same effect, MAC users can first enter slideshow mode, and then left click on the help icon. The link to the guidance is also given in the slide notes on each slide.
Terms and conditions
Downloading the ‘Inclusive Design Log (Transport)’ indicates acceptance of the following terms and conditions. The ‘Inclusive Design Log (Transport)’ is not for resale. The University of Cambridge shall not be liable for any indirect or consequential damage, injury (whether loss of profit, loss of business, depletion of goodwill or otherwise), costs, expenses or other claims for consequential compensation whatsoever (howsoever caused) which arise out of or in connection with the use of the ‘Inclusive Design Log (Transport)’.
Version history
Version 1 of the Inclusive Design Log (Transport) was distributed to the pilot partners of the DIGNITY project for use on pilot projects.
Version 2.0 was created in response to the feedback obtained during these projects. This was launched in December 2022 to coincide with the end of the DIGNITY project.
Version 2.1 was a minor update that improved the data presented for ‘estimate exclusion’ to include data from both the German and Italian surveys. The visual clarity of the example slide on digital personas was also improved. Navigation back to the project board was changed to use slide zooms rather than a hyperlinked home icon, because hyperlinked objects are not supported in the MAC version of PowerPoint.
Version 2.2 was another minor update that improved the navigation instructions and the presentation of the hyperlinks to web content. Links to both the Project and Examples Boards were also added to the top left of all of the activity slides. The formatting of the template slides for the Manage activities was revised slightly to make it more consistent with the other slides. Minor wording changes to improve clarity were also made to some slides.
Feedback
We would welcome your feedback on this page:
Privacy policy. If your feedback comments warrant follow-up communication, we will send you an email using the details you have provided. Feedback comments are anonymized and then stored on our file server. If you select the option to receive or contribute to the news bulletin, we will store your name and email address on our file server for the purposes of managing your subscription. You can unsubscribe and have your details deleted at any time, by using our Unsubscribe form. If you select the option to receive an activation code, we will store your name and email address on our fileserver indefinitely. This information will only be used to contact you for the specific purpose that you have indicated; it will not be shared. We use this personal information with your consent, which you can withdraw at any time.
Read more about how we use your personal data. Any e-mails that are sent or received are stored on our mail server for up to 24 months.